I’ve previously written technical manuals for the United Nations, NCR and ADC Telecommunications, among others, and I’ve found Todo by Appigo to be fantastic for time management and GTD planning.
But in teaching Todo to new users, I’ve found that learning features first causes a “Can’t see the forest for the trees”-type problem. So I wrote this introductory how-to tutorial/quick reference for new owners.
Start with Checklists and Projects
✔  Tip: If you have an iPad, Hold it in landscape (wider instead of taller) orientation to see more on the screen while learning.
Most of us think naturally in terms of projects, like planning an event, or checklists, such as a grocery shopping list.
In Todo, List Folders (like “Home” or “Work”) Â hold all your projects and checklists. Everything you enter into Todo goes into a List Folder of some kind. If you don’t specify a specific List Folder when creating a new item, it goes into the Inbox List Folder.
✔  Tip: Don’t confuse a List Folder with a Checklist. A Checklist is just a list of simple tasks. A List Folder is a kind of container that holds all your Projects and Checklists. (List Folders are also sometimes just called “Lists.”)
How is a Checklist different from a Project?
 Tasks added to a Checklist can never have any options set for them. Tasks added to a Project can have a variety of options, such as due date/time, priority, recurrence, tags and much more. This makes sense, because Checklist items, like those on a grocery list, you simply check off as you complete them.
✔  Tip: When should you use a Checklist instead of a Project? I like starting with a Project, because it gives me the flexibility to add options…or not. But: It doesn’t matter, because you can easily change from one type to the other at any time using the “Type” option in the “Edit Task” window.
The simple Todo hierarchy
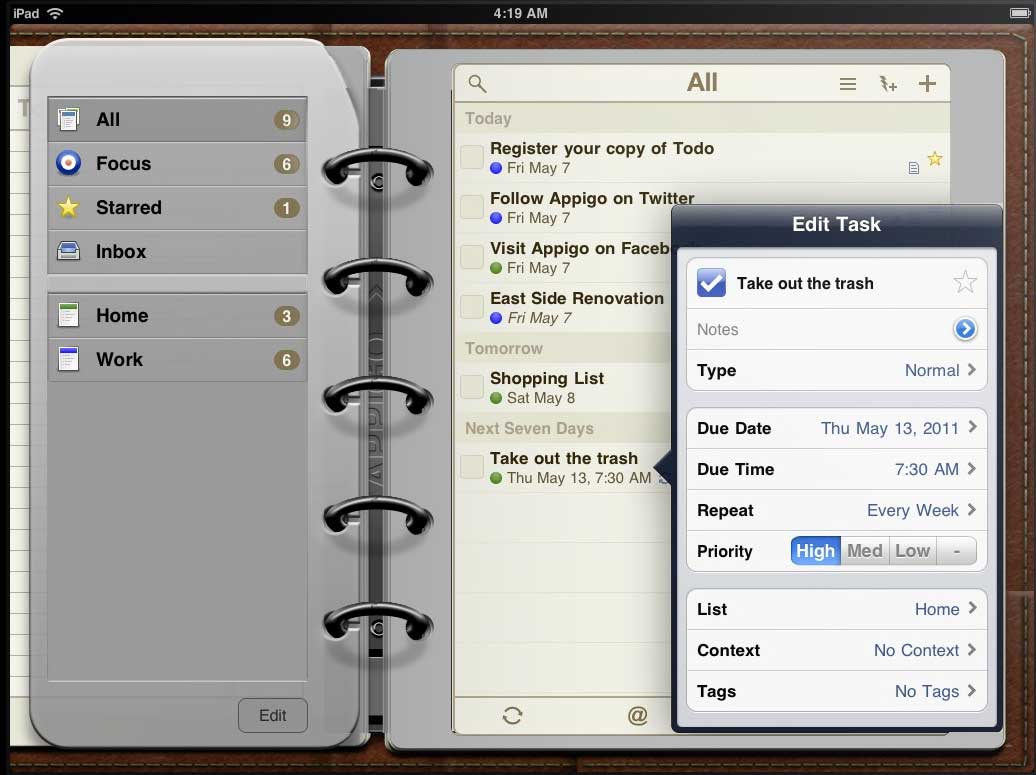
The screenshot below shows the six default List Folders on the left: All, Focus, Starred, Inbox, Home and Work. As you’ve learned, the hierarchy of everything in Todo might look something like this:
- ► List Folders (such as “Home”) contain…
- ► Projects or Checklists (such as “Clean Garage” or “Grocery List”) which contain….
- ► Tasks (such as “Clean oil off garage floor” or “Buy Chicken” “Buy Eggs” etc.) Tasks are your actual “Todo” action items.
- ► Projects or Checklists (such as “Clean Garage” or “Grocery List”) which contain….
✔  Tip: Todo works on both the iPad and the iPhone. For specific technical details about each Todo feature, click here.
This simple hierarchy is the most important thing to keep in mind as you use Todo: List Folders contain Projects and Checklists, and Projects and Checklists contain tasks, which are the things you do.
The Inbox List Folder is a  miscellaneous catch-all location for items you haven’t yet had time to add to a more specific List Folder. All, Focus and Starred are List Folders that let you create custom views of your Checklists and Projects. I’ll cover those in just a moment.
✔  Tip: The Inbox is the only List Folder that has no settings or options you can change.
Create your own personalized List Folders to add Projects and Checklists to
Below the Inbox List Folder  is where the real magic happens: This is where you create and name your own List Folders. The “Home” and “Work” List Folders provided to get you started can be renamed or deleted at any time if you wish.
✔  Tip: To add a new List Folder or delete or rename an old one, just click the gray “Edit” button at the bottom of the left-hand navigation page. (Deleting takes two steps to prevent you from accidentally deleting a List.) Remember to click “Done” when you are finished or Todo will behave strangely.
 One thing to consider when creating and naming List Folders is “How big are the Checklists and/or Projects you will be adding to that List Folder?” If they’re really big, you may want to split them across several List Folders. So, instead of having one List Folder called “World Peace” you may want to have several List Folders, such as “End Hunger,” “iPads for everyone,” etc.
Giving big projects their own List Folders helps a lot, because Projects can’t have sub-projects of their own. So the only way to create a deeper hierarchy such as Work > Maintain Website > Blog Posts > Post 1, Post 2, etc. is to put the Blog Posts project in a List Folder such as “Work: Maintain Website.” This way other website maintenance projects (such as “Add new site sections” or “Site security”) can also be added to the Work: Maintain Website List Folder as well.
✔  Tip: You may want to just delete the “Work” List Folder and create several of your own, such as “Seminars,” “Maintain Website,” “Write Book,” etc.
 Creating Tasks
Normally, all the tasks you enter will be part of some Project or Checklist, which are themselves contained in whatever List you have placed them in.
Tasks that are part of a Project or Checklist are also called Subtasks. Since most of your tasks will belong to some Project or Checklists, most of your tasks can also be called subtasks. This is important because in some List Folders, you can hide or unhide Subtasks. Tasks that are not subtasks are any you add to a List Folder directly, without it being part of a Checklist or Project.
The three kinds of options you can set for Projects, Checklists or Tasks are:
- IMPORTANCE: Due date, Priority or Starred;
- RECURRENCE: One-time or repeating;
- SPECIAL TYPES: Labeled by location (“Context”) or type (“Tags”).
Besides their obvious usefulness, setting these options allows you to create filters which hide or reveal tasks based on their options, such as only viewing overdue tasks. Here’s how that works:
Using special Lists or Filters to view Tasks
The “Focus” list near the top of the left hand navigation pane defaults to only showing you Projects or Checklists that are due soon. You can customize what is shown by:
- Blocking (filtering out) Lists you don’t want to see,
- Choosing to view only higher-priority items,
- Choosing how wide a date range you want to see deadlines for,
- Whether you want to see subtasks, starred tasks, completed tasks, and more.
The “All” list at the top also lets you block (filtering out) Lists you don’t want to see, but otherwise show you all unfinished Projects and Checklists (but no subtasks). If you have assigned Context or Tag labels to tasks, you can choose to filter your view to see only certain ones. You can choose “And” or “Or” logic to determine which labels to show tasks for if you want to filter by several different labels.
✔  Tip: When you learn how to view tasks by Context and Tag filters, be sure to stop filtering when you are done by choosing “All.” Otherwise tasks that don’t fit the filters you set won’t be shown. You could accidentally end up hiding lots of tasks if you forget to turn off filtering!
Why adding color to a List Folder is helpful
When you create a new List Folder, you have the option to give it a color. Everything that is ever contained in that list folder will then use that color (shown as a colored dot at the left of a task, for example). So when you view items via the “Focus” or “All” List Folders, those colors act as a reminder of the type of task they represent.
 Learn the details of how each Todo feature works
So now you understand the overall concept of how Todo works. For the details of how each feature works, visit Appigo Todo’s Features page. Some of the features described on the Appigo site didn’t show all the latest functions of the newest version of Todo when I last visited, but it’s clearly laid out and easy to understand. Comparing the functions you see on your screen with the functions described on their website, I never had any trouble understanding how newer functions worked.
Summary: Steps to begin using Todo
Think of working with Todo in these simple steps (that can be done in any order):
- Create a Project or Checklist to add your “to do” tasks to.
- Place that Project or Checklist into the List Folder that fits it best, such as “Home,” “Work,” or custom List Folders you create yourself.
- Add Tasks to your Project or Checklist.
- Reorganize and set options as needed.
- Check off items as you complete them.
Fantastic deal for new iPad owners:
By the way, iPad users: Get this iPad bundle for just $24!! â–ºiPad Case â–º2-way stand â–ºWraparound grip â–ºScreen protector. We own it and love it. It’s incredibly cheap—and incredibly useful:
The stand is built into the custom-fit hard-shell case, and has rounded grips on the outside that work well as case handles for carrying it around. The wraparound grip feels like rubber—it’s what the product description calls a “Rubberized TPU Case”
How can I manually arrange the (colored) custom lists/folders? I just downloaded the Android app as I am trying to switch from Toodledo.
Thank you. A while since you posted this but nevertheless very useful. I have been using Todo for a while now but have only just read the GTD book (yes really) and was wondering how it would fit.
The only thing that you don’t cover specifically is what DA calls “next actions”. Would you consider a Star, a Context or a Tag to be most suitable for “next actions”. To me it seems a Star might be most appropriate.
Thanks again.
Robert
Agreed. I just didn’t get what the Todo site was talking about regarding “Lists.” I mean, I sort of got it, but they just don’t cover the hierarchy well. I had no idea I should break up my bigger project areas into their own List Folders. I’ve reorganized based on your blog post. Thanks! It makes better sense now.
VERY useful. I struggled with Todo at first and so never really started using it. Once I added it to my iPad I decided I had to force myself to try it again, but remembering my initial confusion still held me back. Thanks for this! I’m now using Todo and loving it.
Cheers, mate. Nice work!