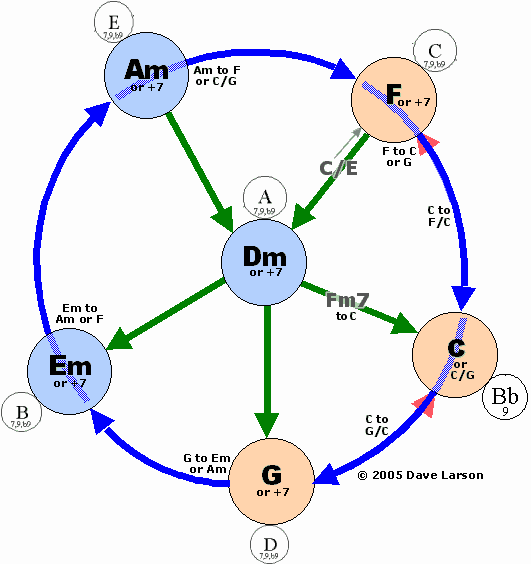
Some years ago I was trying to learn chord progression, and I became interested in trying to create an easy-to-remember all-in-one diagram. The diagram below is what I came up with.
The diagram is set up so that you can immediately remember the direction of the arrows even if they were removed from the diagram: the circle flows clockwise, the center flows down, with the exception that G can move to C, and C to F/C (the red arrowheads). Also, the common blues keys in C are in a peach-colored trio on the right (G7-C-F), and the common minor-key trio in the C mode are on the left in light blue (Em-Dm-Am).
Play any key listed in a colored circle, then choose the next key to improvise in by following the arrows. The diagram is in the key of C. (To transpose, read the last paragraph of this post.) I’ve added some text descriptions within the circle as well to make it easier to learn.
SKIPPING: When moving clockwise around the outside of the circle, you can follow the arrow to the next key, or skip over it to the following key. For example from G you can next play either Em or Am, from Em you can next play Am or F, etc. G is the only key you can’t skip over. Otherwise, all the arrows flow from the top downward. (To help you understand the clockwise movement, I’ve added text labels in most cases.)
Finally, once you are comfortable with the main connections, note the slash chords. For example, instead of playing a C-chord with the right hand, and a single C with the left hand (the most common way to play a chord with both hands, adding the root with the left hand), you can play a C/G–meaning play a G in the left hand instead of a C. (You probably see that a regular C chord could be written C/C to be more specific, but when the left hand plays the root, we just leave off the /C notation.)
In fact, if you move from Am around the circle clockwise to C, it sounds best as a C/G. Moving from C in either dirction also sounds best if you play the slash chord written: G/C instead of G/G, or F/C instead of F/F.
For even more fun and flexibility, see the C/E and Fm7 on the green arrows? You can “insert” those on your way to or from Dm: F > D/E > Dm and Dm > Fm7 > C. The C/E is so flexible you can go either direction–hence the little arrow from it to F.
If you want to transpose to the key of C from some other common keys, you can connect via the small circles on the outside. For example, you could move from an Eb9 to an Am7 at the upper left, and so on in the other positions. The advanced chart (not shown) also includes alternate chord types. For example, the F in the chart can be an F6, M7, m, or m6, and the G leading to C can be a 7, 9, 11, 13 or sus–and so on.

With your diagram I don’t see how to reach the “50s progrssion” = I–vi–IV–V. For example, in C major: C–Am–F–G. As the name implies, it was common in the 1950s and early 1960s and is particularly associated with doo-wop
Easy-to-remember all-in-one chord progression diagram. Very good article & easy to understand chart. As an amateur guitar player, I don’t practice as often as I should and this really helps me to remember the basics. Thanks. Got your link from Twitter. My twitter account is http://www.twitter.com/@AZsunwoman. Please let me know if you share any other tips on guitar playing. ;_)